People said that it’s easy!
But I felt dumb when trying GitHub/GitLab Pages…
TL;DR
- I was struggling to set up my blog using GitHub/GitLab Pages.
- Recently I successfully using GitLab Pages and Hugo to build my blog.
- The main steps are:
- Fork Hugo example project.
- Go to ⚙️ Settings > General > Advanced > Change path and
change
hugotousername.gitlab.io. - In the forked repo, change the first line of
config.tomlfromhttps://pages.gitlab.io/hugo/tohttps://username.gitlab.io/, and remember to submit online. - Visit your blog at
https://username.gitlab.io/,
Blogging with Markdown
Markdown is my first choice to write testing/learning/working notes. It’s easy and capable of producing nice page in browsers. Therefore, when I knew that there’s GitHub Pages which enable people to host their markdown files as blog posts, I immediately had a strong desire to try it! After following the instructions I succeeded to upload my testing blog post. The process, however, was totally a mess, and I never feel solid about building my own blog site on that.
Several days ago, Jeremy Howard tweeted about how to write blog posts for GitHub Pages. The tweet reminded me of trying to blog with markdown again. Because I have transferred to GitLab for a while and have had nice experience, this time I decided to try GitLab Pages.
There are 5 steps on the official instruction of GitLab Pages to follow. Some are easy but some might be out-dated. The following steps are based on the official instruction with my recent (2020-01-23) experiences added. FYI.
Pick an example page and fork it [STEP 01]
This might be the most simple step. Just go to GitLab Pages examples and click the examples to see which one fits your need.
I want something as simple as possible (but yes, no simpler) and easy to maintain. Because I lack experience and knowledge of website frameworks, I have to choose something popular so that there would be easy solutions when I get stuck.
My final choice was Hugo because of its popularity. Also, the example Pages looks promising and the Math Sample blew my mind! I can just display math equations using beloved LaTeX syntax such as: $$ L(x,y) = \frac{\partial^2 I}{\partial x^2} + \frac{\partial^2 I}{\partial y^2} $$ Pretty cool, huh?
In my case, I forked the Hugo example project
as my project in https://gitlab.com/hiankun/hugo.
The url won’t match most people’s expectation (who want the hugo part?),
we will change it later.
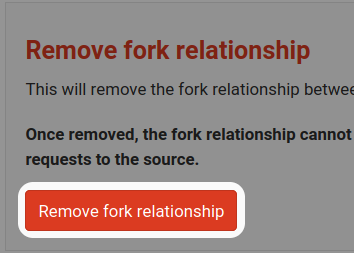
I forked the example project for my own usage and didn’t plan to contribute anything to the source project, so I removed the forking relationship from the ⚙️ Settings page.
Enable shared Runners [STEP 02]
I did nothing for this step and my Pages runs well.
The official instruction told us to enable shared Runners in ⚙️ Settings > CI/CD. When I checked it I found the “Enable shared Runners” button has become “Disable shared Runners” and it listed 10 available shared Runners. Actually I don’t really understand what the Runners are, but according to the shown messages I assumed that new version of GitLab Pages has some default Runners and we can just leave them untouched.

Pages and project configurations [STEP 03]
Although the official instruction labeled this step as optional,
for me it’s essential.
I guess no one want to show the url of their personal blog as something like
https://username.gitlab.io/projectname.
Instead, you may want people reaching your blog via cleaner url such as
https://username.gitlab.io.
Here are two concepts need some clarifications:
- The Project name, and
- the blog url (Path).
Let me explain to you.
The Project name
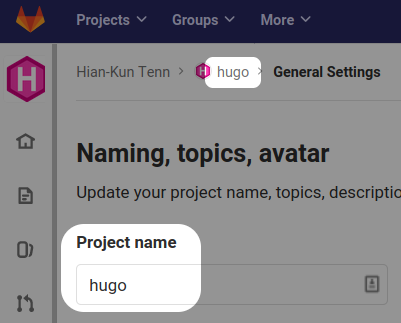
At the top of the ⚙️ Settings > General page, your can see settings for “Naming, topics, avatar.”
Note that the Project name is the… project name. I mean, it’s the name of the “project” you have just forked (and will clone to your local machine later) and has nothing to do with the blog’s url.
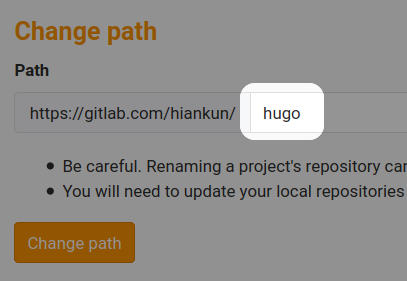
The blog url (Path)
Go to ⚙️ Settings > General > Advanced and you will find the Change path setting. It is the blog url, i.e. the Path.
Change the Project name and the Path
After forking the Hugo example project,
as the next two figures show,
both the Project name and the Path were set as hugo.
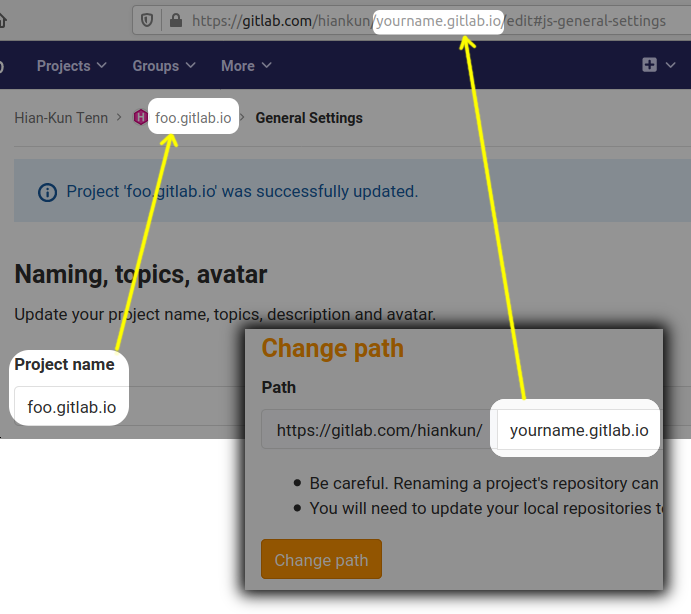
Let’s rename them as foo.gitlab.io and yourname.gitlab.io,
respectively.
Then you can see the changes as that shown in the following figure.
NOTE: The
yournamehere is just for exemplary purpose. According to the official document, you should put your own username. Any other random names won’t work in real case.
In my own settings, I set both of them as hiankun.gitlab.io
so that:
- I can clone the project with the name of
hiankun.gitlab.ioto my local machine for further editing and maintenance works. - My blog will appear on internet with the url as
https://hiankun.gitlab.io/.
An essential step for config.toml file [STEP 03.5]
This step was not mentioned by the official instruction because it has to be done
on the Hugo side,
and the setting resides in the config.toml file.
To make life easier, I suggest you edit the config.toml on line.
Of course later you can (and maybe should) clone the project
to the local machine and do stuff off-line than update your blog via git push,
but before you cloning the project,
edit and commit it online will trigger the pipelines process.
By doing so, you can skip the next step (STEP 04).
The figure below shows the online config.toml file.
Your should change its value from
https://pages.gitlab.io/hugo/ to https://yourname.gitlab.io/.
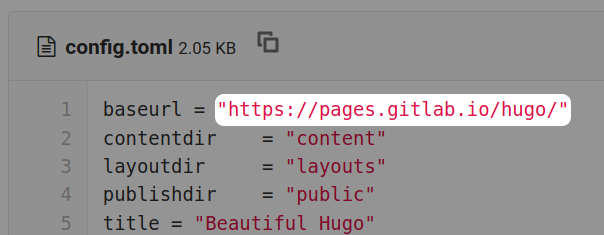
And remember, submit the change.
Manually run a pipeline [STEP 04]
You can skip this step if you have followed STEP 03.
Before you doing the online editing and submission stuff just mentioned in the previous step, you don’t have any pipelines running as that shown in the figure below. You can check it via 🚀 CI/CD > Pipelines (NOT in ⚙️ Settings > CI/CD).
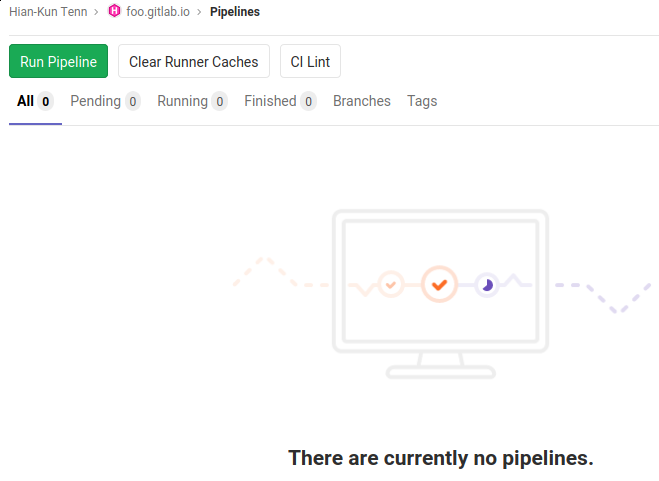
You can click the Run Pipeline button to start the process.
However, we have just submitted the modified config.toml online,
we can just skip this step because it has begun the pipelines automatically:
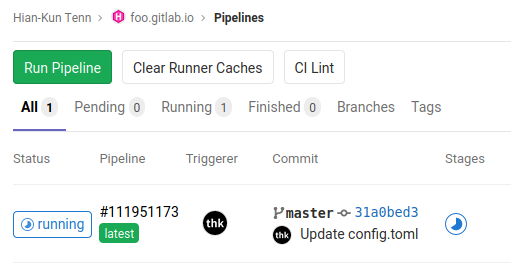
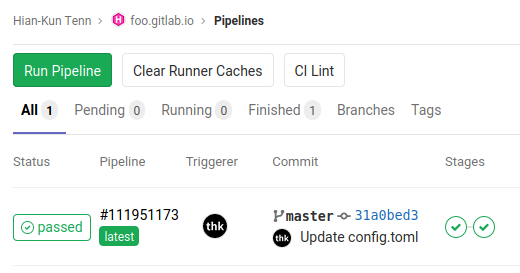
The above figure shows the pipeline status just after my online submission. Then, its status will go from running to passed:
Check your blog online [STEP 05]
If everything went smoothly, you should be able to view your blog via
https://yourname.gitlab.io.
Clone the project for real blogging
It’s not feasible to do all the blogging stuff online.
We should clone our new-born project to our local machine
so that we can update and maintain our blog and posts with
our familiar editors (such as Vim)
and toolkits (such as git).
I have made this post a bit too long and I have to do something else now, so I will share my understanding of fine tuning the blog configuration and the work flow of managing the posts in the next post: A Simple Guidance to Use Hugo in GitLab Pages (2/2)