This is the second part of “A Simple Guidance to Use Hugo in GitLab Pages.” The first part is here: A Simple Guidance to Use Hugo in GitLab Pages (1/2)
TL;DR
- Set up in GitLab Pages is one thing; how to fine-tune your blog and edit/update your posts is another.
- Here are the files for you to fine-tune your blog to personal need:
config.tomlcontrols which component will appear on your blog.content/_index.mdis your “Home Page.”content/page/about.mdis the default “About Me” file.
- Here are some tips might help you to edit your post:
- Put your posts (e.g.,
your-post.md) incontent/post/. - If necessary, use
[](/post/your-another-post/)inyour-post.mdto link toyour-another-post.md. - Put your images in
static/your-img-folder/and in your post useto show the images. - Install
hugoto facilitate local works such as post preview.
- Put your posts (e.g.,
Work at local machine
So we have done the basic settings on GitLab Pages. Now it’s time to clone the repository from GitLab to your local machine, and fine-tune it to what you want.
Fine-tune the blog
After cloning the blog project to the local machine, we need to do some works to make it matching our own needs.
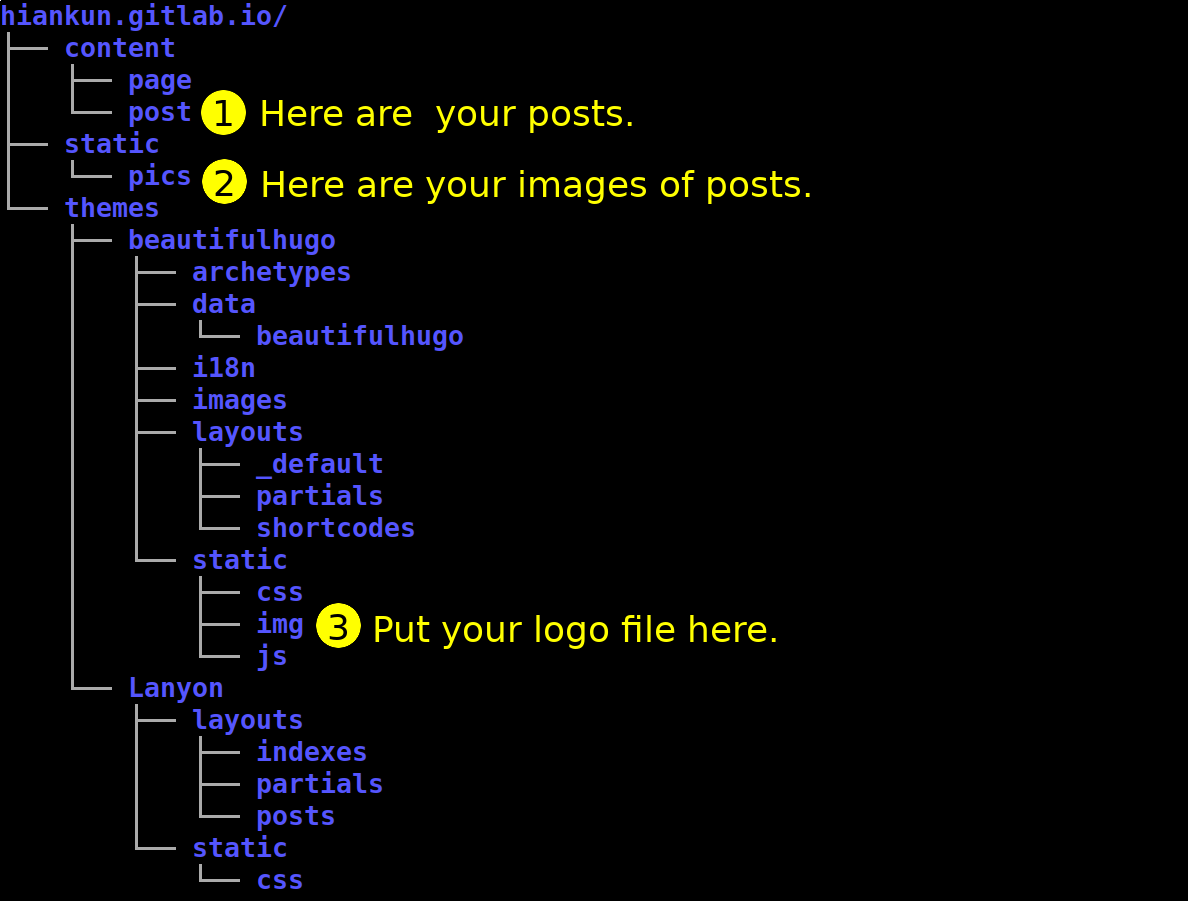
Before we dive in, I’d like to show you the file structure of the cloned project.
I have highlighted three directories in the figure below
and they will be mentioned in the following content.
(NOTE: The static/pics/ directory was created by me,
so you won’t have it in your project now.)
Use config.tmol to control the components
This is our second time of visiting config.tomol.
In the previous post
we have edited it online using GitLab’s UI.
There are several parts in the config.tmol file.
I listed what I have modified or kept as follows:
baseurl = "https://hiankun.gitlab.io" # We've modified this previously.
title = "hiankun's notes"             # The title of your blog.

[Params]
  subtitle = "ū siá ū pópì"           # Just a subtitle...
  logo = "img/thk-icon.png"           # The logo file is located in the path of
                                      # themes/beautifulhugo/static/img/your-logo.ext
                                      # which is labeled as ➌ in the previous figure.

[Author]                              # Set your name and various contact info
  name = "Tēⁿ HiànKun"                # here. They will appear at the bottom
  email = "hiankun@gmail.com"         # of your blog.
  gitlab = "hiankun"
  github = "hiankun"
  twitter = "hiankun_taioan"

[[menu.main]]                         # All this items show on the right side
    name = "Blog"                     # of the blog's top bar.
    url = ""                          # I keep only three of them and commented
    weight = 1                        # out others.

[[menu.main]]
    name = "About"
    url = "page/about/"
    weight = 3

[[menu.main]]
    name = "Tags"
    url = "tags"
    weight = 3
The “About” pages
There are two places for the “About” information:
content/_index.mdis your “Home Page” and you may want to say something about your blog or something impressive.content/page/about.mdis the default “About Me” file. In my opinion it is similar to the above one but you probably have more ideas about these two files.
Manage the posts
Posts, images, and links to other posts
The files and paths were identified during my experiments of composing posts. Although there might be better ways to locate and to manage all the files, I just share what I’ve got anyway.
First, your posts should be putted in content/post/,
which has been labeled as ➊ in the previous figure.
You should put all your posts here.
After you submitting the your-post.md to GitHub Pages,
their pipelines will automatically update your online blog and the post url
will be something like https://yourname.gitlab.io/post/your-post/.
Based on this mechanism, if you have to link to your other posts,
use the format of [](/post/your-another-post/) in your-post.md
Then you probably need to put your images in the post.
You can create your-img-folder under static/,
which has been labeled as ➋ in the previous figure.
Now you have a customized image directory named static/your-img-folder
and you can put your-image.ext there then use 
in your-post.md to show the image.
One more useful tip here.
We often have some drafts which are not ready to go,
but we may also want to keep them in the same project rather than somewhere
else so that they can be updated to GitLab as other files.
Just write down draft: true in your draft posts then you can push them to
GitLab without publishing them in you blog.
Okay. So far so good. We have everything ready and we can happily compose our posts as normal markdown files and update them using familiar 🤔 git work flow.
Install hugo for post preview
This might be optional. But without hugo installed in your local machine, you cannot preview the posts (and the overall blog if you’ve changed some settings) before submitting them to GitLab Pages.
The installation should be easy, just follow the official instruction.
The usage is also simple.
In my Lubuntu 18.04 terminal, I only need to fire up hugo server -D
and open http://localhost:1313/ in my browser.
Every time you make any change in the project and save it,
the local preview of you blog residing in the browser will update accordingly.
The -D option of hugo server -D enables the preview to show all the drafts.
It is handy to preview the drafts in our local machine.
That’s it.
Hope this is helpful to you and happy blogging.